
We really aren’t exaggerating when we say the list of new signup features and refinements is long in PlanHero 2.0.
To jump to the summary of any of the topics below, just click “Link” next to the topic!
-
Form Lists
-
Dedicated Public Group Pages for Events (for paid subscriptions)
-
Custom Confirmation and Email Reminders
-
See Open Spots at a Glance
-
Upload a Document/Photo/Form in Description Area
-
New Recurring Dates Options
-
Apply List to Selected Dates/Location
-
Remove or Edit a Date from Recurring Dates
-
Add a Time Gap Between Time Spots
-
Better/Easier Signups – Cart idea
-
Better/Easier Sign Someone Else Up
-
Improved Organizer Management OF Participant Signups (editing, adding comments, deleting)
-
Start/Stop/Lock Signup (available on Essentials, Professional Plan, and Enterprise Plans)
-
Limit Signups per Person by Date/Item/Event (available on Professional Plan and Enterprise Plans)
-
Expanded Reports
-
Improved Signup Management FOR Participants
-
Embed in Website (available on Professional Plan and Enterprise Plans)
-
Collect Money for Time Spots or Items
-
Select In-Person or Online for Location
-
Multiple Co-organizers
-
Multiple Group Admins
-
Edit Participant Entries for Past Dates
-
Free Plan
-
Easy Messaging Plus a Log + Direct Response to Message Emails
-
Sort/search Events
-
Change Time Zone by Event (default is in My Account)
-
Custom URL (for paid subscriptions)
-
View Signups on Past Dates
Better/Easier Signups – Cart idea

We wanted to make the sign up process as easy as possible. So we used an approach that almost everyone is familiar with: the shopping cart in e-commerce.
You click the Sign Up button (for an item or a time spot), select the amount you want (e.g. two items or one time spot), and then click ✓Add to add it to your cart. When you’re ready, you click on the Review & Confirm Signups button and enter your contact info.
Participants can elect to receive text reminders for their signups, message the Event organizer, and/or create a free PlanHero account. Creating a free PlanHero account is optional, but, if you do, you can easily view and edit your signups from our easy to use dashboard.
And finally, after confirming your signups, you can sync them to your calendar.
Better/Easier Sign Someone Else Up
We know Event organizers are busy people. After watching thousands of screen reviews, we knew we could make it easier for our organizers to sign up other people. In addition, we know that not all participants have email addresses. So we have made it much easier to both sign up other people and also to sign up people using the organizer’s own email address (but the participant’s name). This will be particularly useful for our faith-based customers. It is also useful when friends or families want to sign up other friends or family members either using a single email address or that of their friend, spouse, or children.
Apply List to Selected Dates/Locations
When you create a Signup List (either Simple or with Time Spots), you will notice the option at the bottom of the creation form that says, “Apply this list to:”
You have the choice of applying (or pasting) this Signup List to:
Just this date and location
All dates & locations
Only the following dates:
If you toggle the last option, Only the following dates: , all of the Date & Location combinations for your Event will be listed.
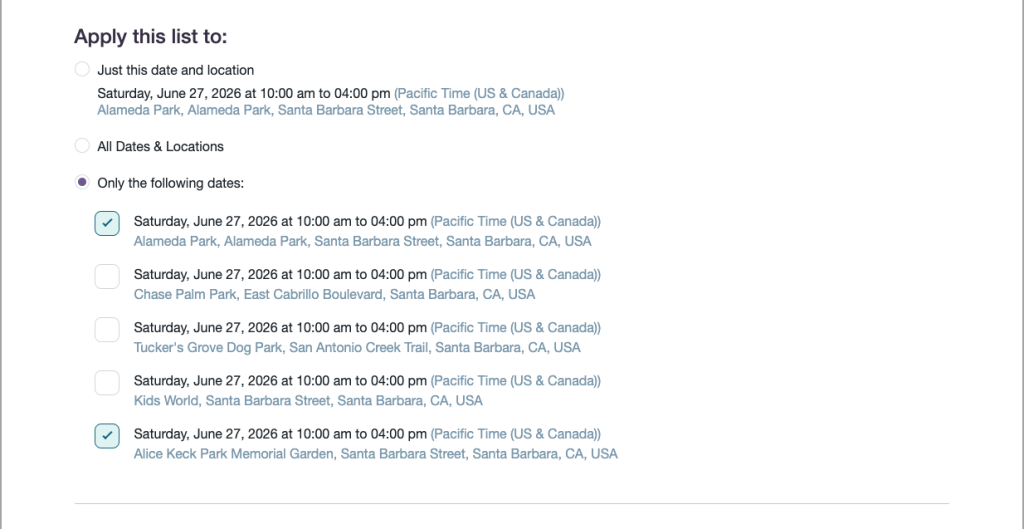
You can then check the boxes for the Dates & Locations to which you want this particular Signup List applied (pasted).
Don’t forget to click either Create List or Update List once you’ve checked the appropriate boxes!
Improved management of participant signups (editing, adding comments, deleting)
Once a participant has signed up for items or time spots, the organizer can now easily edit those signups.
Simply click on the Event Signups tab, then scroll down and find the participant whose signups you wish to edit.
Click the pink “eye” icon to view the participant’s signups.
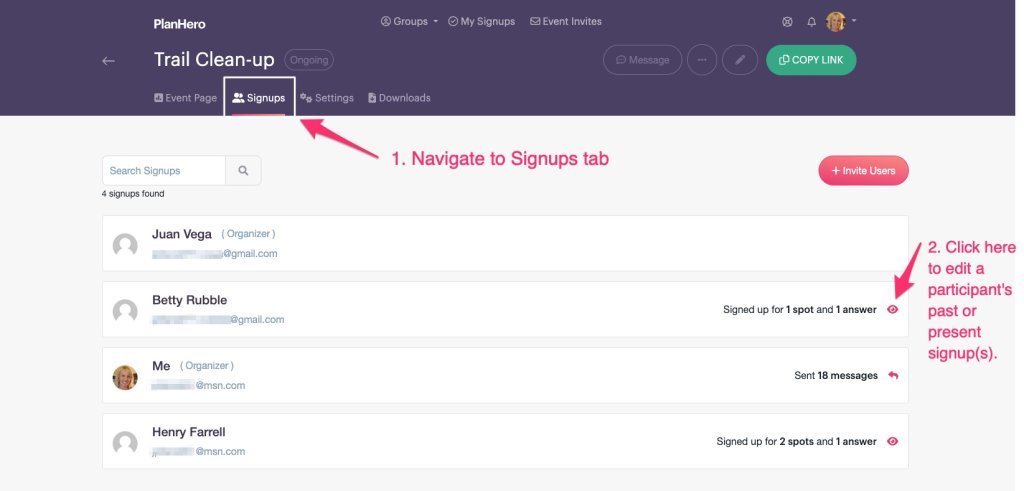
Scroll to the bottom and click the pink Edit Signups button to edit the participant’s signups and/or name and contact information. Here you can edit the Amount, add a Note, or delete the signup. You can also edit the participant’s name and email address (with the exception of participants who have already created a PlanHero account).
Then click the pink Save Changes button at the bottom and you are good to go!
Expanded Reports
We have expanded our reports for our Essentials and Pro customers.
Free Plan:
- PDF downloads
- Containing all Event SIGNUPS for the whole Event
- Containing all Event SIGNUPS for a single Date of the Event
- CSV downloads
- Containing all Event SIGNUPS for the whole Event
- Containing all Event ITEMS for the whole Event (this includes ITEMS that no one signed up for)
Essentials Plan:
- Same as Free, plus:
- CSV of Event Signups by Selected Dates
Pro Plan:
- Same as Essentials, plus:
- CSV of Event Hours worked for all Participants or Selected Participants
- Account Level Downloads:
-
- CSV file of hours worked by PARTICIPANTS sorted by:
- Groups
- Dates
- Participants
- CSV file of hours worked by PARTICIPANTS sorted by:
-
- CSV file containing all the Event SIGNUPS sorted by:
- Groups
- Events
- Dates
- Participants
- CSV file containing all the Event SIGNUPS sorted by:
-
- CSV file containing of all Event ITEMS sorted by:
- Groups
- Events
- Dates
- Participants
- CSV file containing of all Event ITEMS sorted by:
Pro Plan EVENT Report Downloads

Pro Plan ACCOUNT Report Downloads

Improved Signup Management for Participants
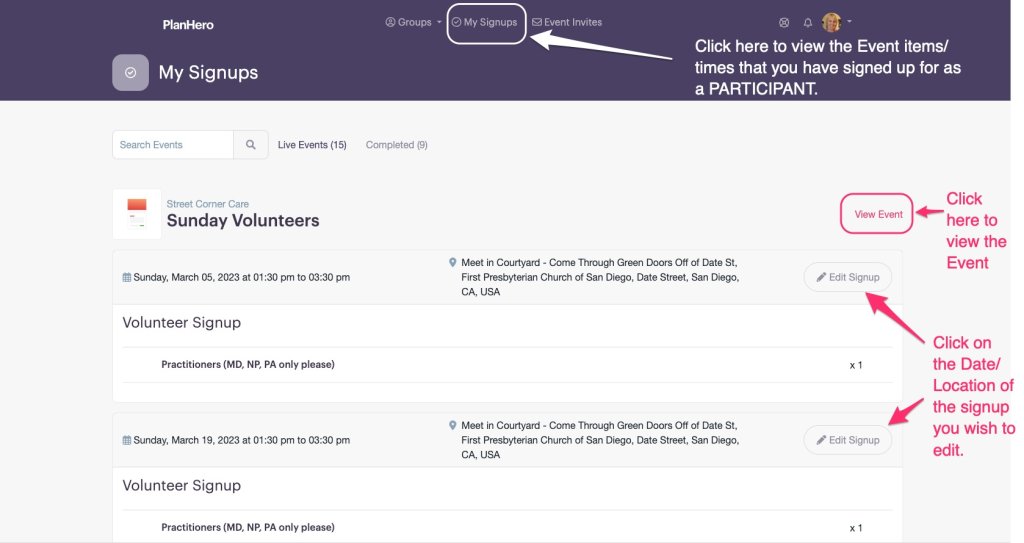
To manage one’s own signups, simply create a free account with PlanHero. You may do that here.
Don’t forget to Activate your new account by clicking on the button in your Activation Email (check Spam/Junk/Promotions folders if you do not see the email in your inbox in a minute or two).
Once logged in, navigate to the My Signups tab. Here you will find all the Events for which you have signed up. If you have signed up for multiple spots on an Event, you will see them individually listed by Date and Location. You can search your signups by Event Title as well.
Embed in Website (coming soon! – available on Professional Plan and Enterprise Plans)
You can seamlessly embed PlanHero into your website. People can sign up without ever leaving your website!
Simply go to your Event Settings and copy the embed code. You can then paste the code into your own website. As a responsive web app, PlanHero will automatically size to the maximum allowable size of the web page to ensure an ideal user experience.
Professional and Enterprise Plans only
Start/Stop/Lock Signup (available on Essentials, Professional Plan, and Enterprise Plans)
Sometimes it’s important to set some restrictions for adding, editing, or deleting signups for an Event. This might happen when:
- You don’t want anyone to add, edit, or delete their signups without contacting you first.
- You don’t want any last minute changes – particularly when it will leave you short of help or with wasted time.
- You need to create a printout of who is participating in advance of the Event date(s).
- You have high demand for participant spots and you want everyone to have equal access at the same time.
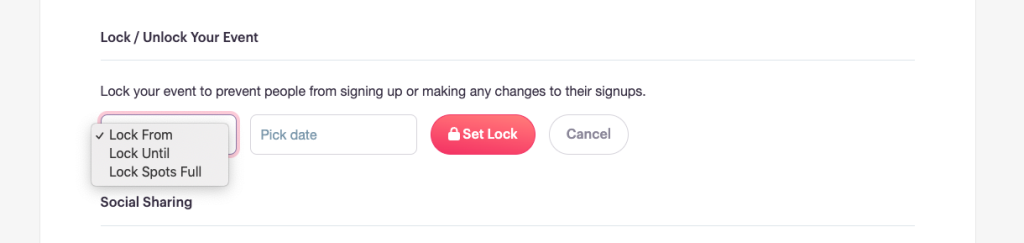
You can easily set these restrictions in your Event Settings.
- On your Event Page, click on Settings.
- Scroll down to Lock / Unlock Your Event
- Either click Lock Event Now (to immediately lock the Event, thereby preventing participants from adding, editing, or deleting their signups), or;
- Click on Configure Event Locking and select an option:
- Lock From
- Lock Until
- Lock Spots Full
Limit signups per person by date/item/event (available on Professional Plan and Enterprise Plans)
You can limit how many spots a person signs up for with our Limit Signups feature. Go to your Event Settings and scroll down to Limit users to a maximum number of signup spots.
Here you can set the numeric limits either by Per Event, Per Day, or Per Item. Changes are automatically saved.
If you select Per Event, the user will be limited to X# signups for the entire Event.
If you select Per Day, the user will be limited to X# signups for each day of the Event.
If you select Per Item, the user will be limited to X# signups for any Item in your Event. NOTE: If your Event has multiple Items, the Limit is placed on each of those Items. So for example, if you have 10 different Items or Time Spots, and you set the Limit to 1 per Item, participants can only sign up for “1” of each Item. But that means they could sign up for 10 Items total.

Collect money for time spots or items
We’ve made it super easy for you to collect money for Items and for Time Spots. As before, you’ll need to first connect to a Stripe account (simple, quick process) before you start collecting money.
Then, when you select either a Simple Signup List or List with Time Spots, you can elect to Collect Money for items.

And that’s about it! You will create your List and then add a price for each Item in your List.

Form Lists
We’ve added a new type of List: Form Lists
You can choose from Short Answer, Multiple Choice, Checkboxes, and Dropdown style questions.
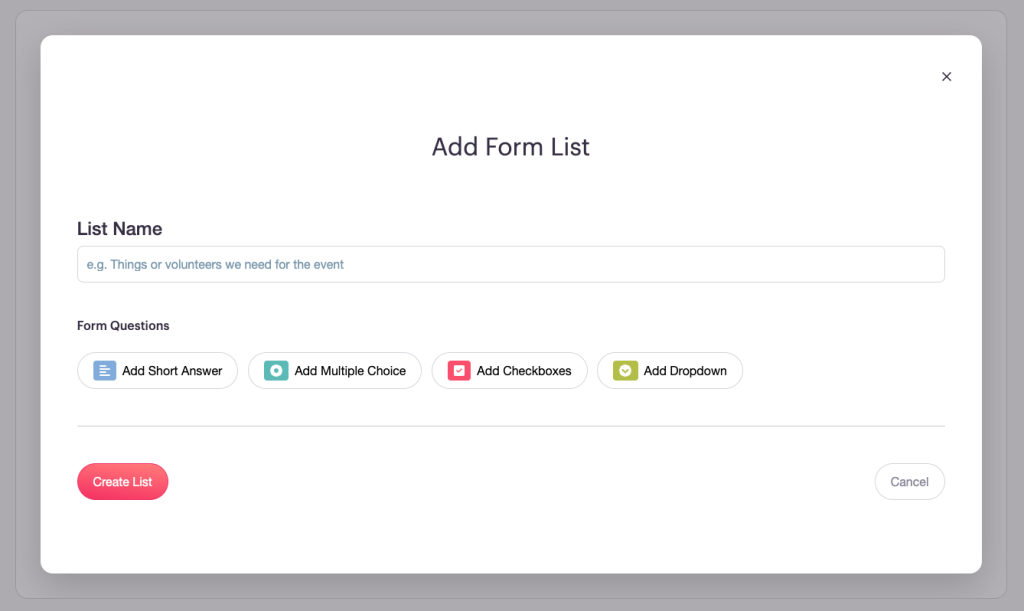
Short Answer: Use this when you need the participant to type in information such as their age or address.
Multiple Choice: Use this when you want to allow participants to select one or more selections/answers (for example volunteering areas of interest).
Checkboxes: Use this when you want to limit participants to a single selection/answer (for example t-shirt size).
Dropdown: This is similar to Multiple Choice, but more tidy. If you have a long list of selections/answers (for example t-shirt sizes), the Dropdown option might be best for you. It will keep your Event Page shorter and tidier.
Privacy: Note that Form Lists choices/responses can only be seen by the participant and by the organizer(s) and admin(s). Participants cannot see other participants’ Form List entries.
Usage: There is only one Form List per Event (regardless of whether the Event is a single date or multiple date event). You may, however, have as many questions in your Form List as you would like!
Multiple Co-organizers
We’ve added the ability to have more than one co-organizer for an Event depending on which subscription plan best suits your needs:
- Free Plan: One co-organizer per Event
- Essentials Plan: Two co-organizers per Event
- Professional Plan: Three co-organizers per Event
- Enterprise: Let’s talk!
You can also set which co-organizers will receive notifications and/or contact messages from the Event:
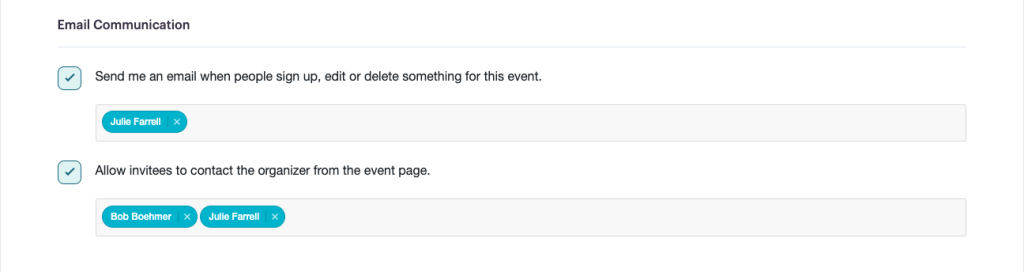
Multiple Group Admins
We’ve added the ability to have more than one Group Administrator for a Group depending on which subscription plan best suits your needs:
- Free Plan: No co-group admins
- Essentials Plan: One co-group admin per Group
- Professional Plan: Three co-group admins per Group
- Enterprise: Let’s talk!
You can also set which co-group admins will receive notifications and/or contact messages from Group Events. All co-group admins are automatically added as (additional) co-organizers for Events.
Edit Participant Entries for Past Dates
We now have the ability to edit the signup entries for past dates. This is handy when: 1) Someone doesn’t show up for their shift so you want to delete their signup; 2) Someone works an extra shift or similar and you want to give them credit for it.
To edit/delete/add a participant’s signup(s) for past dates, click on the SIGNUPS tab in your PlanHero dashboard. Then navigated to the desired participant’s name, click the “eyeball” to right of it, and start editing.

Free Plan
Now you can enjoy PlanHero for free.
To qualify for a free subscription:
- You may have no more than one active Event at a time
- An Event may not last longer than 30 days
- You may have no more than three Events total
Messaging is easy and there’s a log + direct response to Message emails
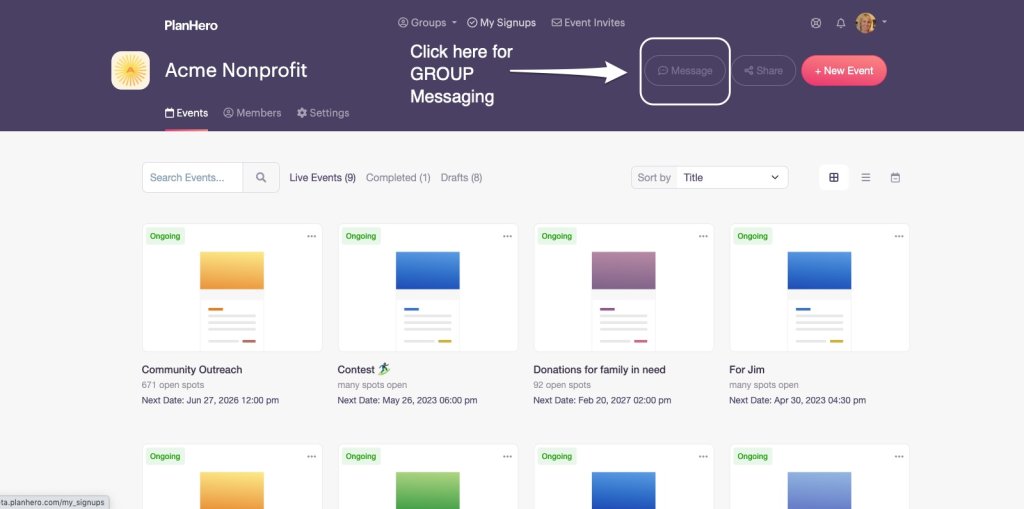
Our new Messaging feature allows organizers and admins to send messages either to a Group or to those who have signed up or been invited to an Event.
Group Messaging:
If you have invited people to become Group Members, you may send them email messages via the Messaging feature. Group Members may also reply to these messages. As an admin or co-group admin, you will receive a notification regarding the reply. In addition, you will have a log of the various conversations in your Messages tab.
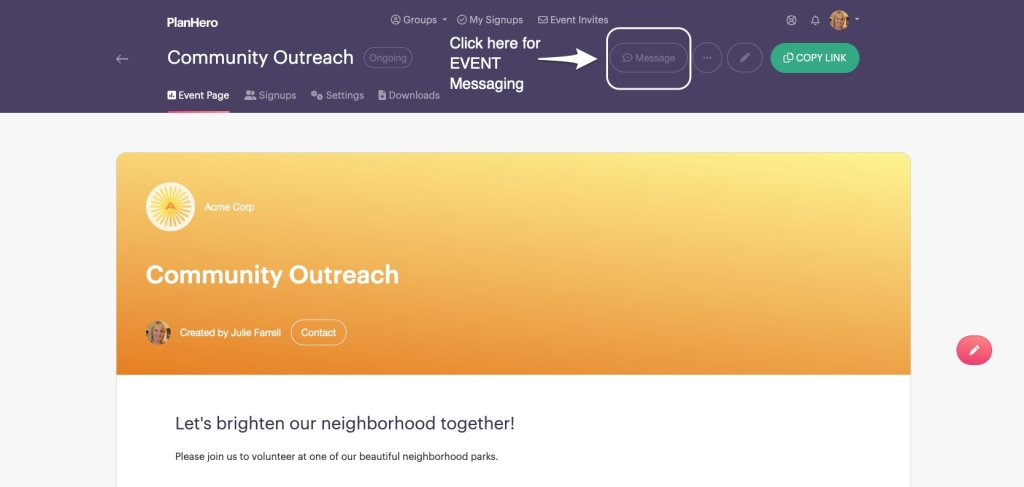
Event Messaging:
You may send email messages via the Messaging feature to people who have signed up for your Event. You may send them only for those who are signed up for a particular Date/Location, or to all those who have signed up. Participants may also reply to these messages. As an admin, co-group admin, organizer, or co-organizer, you will receive a notification regarding the reply. In addition, you will have a log of the various conversations in your Messages tab.
Sort/search events
My Signups: for participants – easy way to view one’s own signups
If participants elect to create free PlanHero accounts, they can now easily view all of their signups in one convenient spot via the My Signups tab. Rather than clicking through Events with multiple Date and/or Locations, or scrolling down long Item Lists, the participant’s individual signups are all neatly presented by Group and then by Event and then by Date & Location. Participants may also filter their signups.
Signups may be deleted and/or edited from this screen as well.
This feature is particularly useful for power users who are signing up for many Events and/or many Dates/Locations.
Dedicated Public Group Pages for Events (for paid subscriptions)
You can display all or selected Events on your Public Group Page or Public Organization Page (Professional and Enterprise subscriptions). The link to your Public Group Page or Public Organization Page can then be shared to showcase all of your Events at the same time in one convenient place.
- From your Event Page, click on Settings.
- Scroll down to Public Page(s).
- Click the checkbox to Include the Event in your Public Group Page.
- Click the checkbox to Include the Event in your Public Organization Page (Professional and Enterprise subscriptions only).
Change time zone by event (default is in My Account)
Your default Time Zone can be set in your account settings under the My Account tab. Once set, all of your Events will be pre-populated with the zone in your account settings.
You can however, set a different Time Zone for any of the Events that you create. The selector is found in the Dates and Locations block of the Event Page. It is under Timezone. Make sure you click the SAVE button to save your changes!

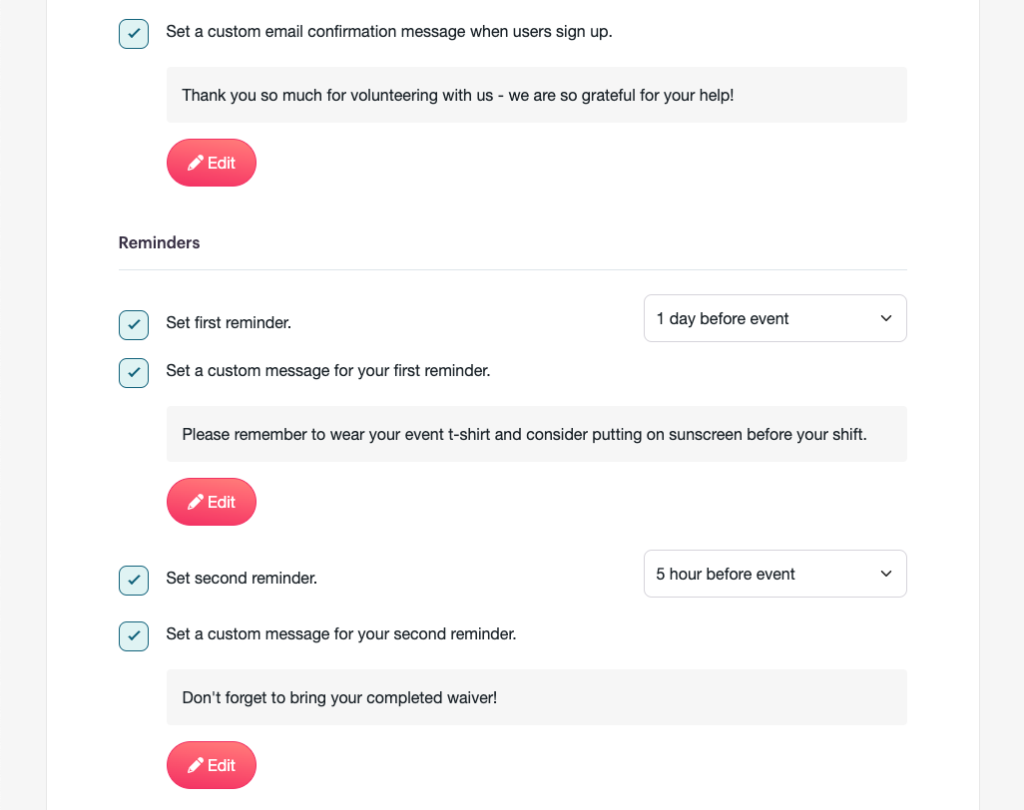
Custom confirmation and reminder emails
Now you can customize the messaging on PlanHero confirmation emails and reminder emails. Want to send a special thank you upon sign up? Add a special message in the confirmation email! Need everybody to wear their event t-shirt? Add a note in the reminder email!
Custom confirmation and reminder email messaging may be added via your Event Settings.
Open spots are color coded
To quickly determine where open spots still remain in your Event, simply click on the Calendar view on your Event Page. The numeric dates on the calendar are color-coded. If the number is green, then there are open signup spots, if the number is red, then there are no more signup spots available for that date.
In addition, you’ll see how many signup spots are open date slider, as well as when you hover over a date in the Calendar view.

Custom URL (for paid subscriptions)
When you create an Event, PlanHero automatically adds your Event Title to the URL. If you would like your URL ending to be different from your Event Title, you may change it in your Event Settings.
Simply scroll down to the Event URL heading and type in your new custom URL ending. Your changes will be automatically saved. NOTE: You need to add a hyphen between each word.
Upload a document/photo/form in Description area
If you need to include an attachment with your Event, you can easily attach a document or photo in the Event Description area.
Acceptable attachment types are: jpg, jpeg, png, pdf, doc, docx, gif
Maximum file size is: 8 MB
- Make sure you are in edit mode by clicking the Edit Event Page button in the upper right corner of your dashboard.
- Click the Edit Pencil in the Description box.
- Scroll down to Attach a file to your event.
- Click on Select file.
- Select the file on your computer or cloud drive to attach to your Event.
- The attachment is automatically saved.
View Signups on Past Dates
Now both organizers and participants can view who signed up on past dates. However, participants cannot sign up for past dates.
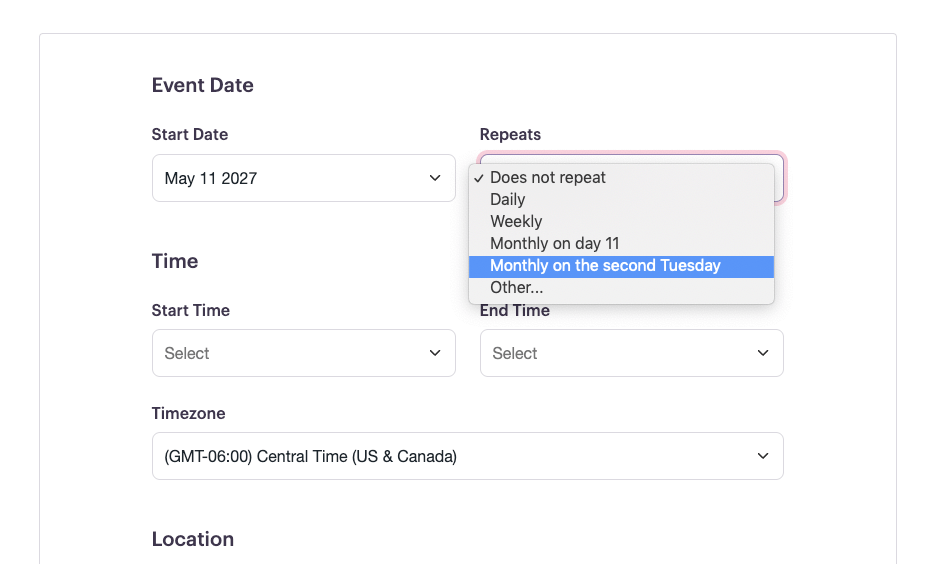
New Recurring Dates options
In addition to our current offerings, you can now have dates recur on a specific numerical day of the month (e.g. the 7th of month), or the 1st, 2nd, 3rd, 4th, or 5th day of the month (e.g. the 2nd Thursday of the month), or alternating weeks or months.
Select In-Person or Online for Location
Organizers can select In-Person or Online for the Event Location.
For In-person events:
- Select In-person
- Enter the Venue Name (e.g. Conference Room #7)
- Enter the Address (the Address field is connected to Google Maps)
- NOTE: For solitary locations, such as for 24-hour prayer signups, just enter something like “Somewhere peaceful” and leave the Address field blank.

For Online events:
- Select Online
- Enter the online link (e.g. a Zoom or MS Teams link)
- Your online link will be a hotspot (a live link) on your Event Page

Remove or Edit a Date from Recurring Dates
Now you can delete or edit one or more dates from a recurring series of dates.
For example, let’s say your group meets on the 4th of each month. You create your event and create signup lists that you apply to all of your dates for the year. Then you realize that you are not going to meet on July 4th.
You can simply click on July 4th and delete that particular date without disturbing the remaining 11 dates for the year!
Add a Time Gap Between Time Spots
No you can add a gap in-between your Time Spots.
For example, if you are setting up 25 minute conferences or meetings, but want a five (5) minute gap between each meeting, we can make that happen automatically! Boom – big time saver!
This feature will be super helpful for scheduling parent-teacher conference signups, private pastor meetings, professional or training sessions, etc.

